Custom Cable Builders – Tips & Tricks to Build What You Need
Thank you for considering CE Auto Electric Supply to build cables to your specifications for your project! To streamline the process, we’ve spent hundreds of hours developing the following tools:
- Custom Cable Builder – the original!
- Custom Cable Builder 2.0
- Breakaway Connector Cable Builder
- Flag Terminal Cable Builder
- Fusible Link Cable Builder
- Aftermarket Terminal Battery Cable Builder
- Multi-Cable Builder
All can be easily accessed via the Custom Cables menu above. Each allows you to quickly design and order cables to fit your application perfectly! In addition, you’re able to see each cable come together live as you build it. Furthermore, the very image you see of your cable design is exported to your invoice when you click the ADD TO CART button and it’s what our production team builds from. The entire process is simple, and you get exactly what you see – whether on a desktop, tablet, or your phone. No other company is as serious about custom cables as we are!
Our custom cable builders allow you to build nearly any conceivable type of cable. Of course, there are seemingly endless approaches. Here are some guidelines that will help you to utilize them.
Choosing the Correct Cable AWG
What cable size (AWG) do you need? Cable size requirements are a function of current versus length. Specifically, cable is chosen so that the voltage drop across its length is minimized. If you’re ordering a replacement cable for one which has failed, it’s easy to determine the size you need. If you’re starting from scratch, that may not be so easy.
Let’s say that you dropped a big block engine into an engine bay where a small block used to be. That doesn’t necessarily mean that it will require more current to start it than the small block it replaced. However, if you dropped in a later model crate engine – an LS, Coyote, or Gen3 Hemi for example – then the higher compression these engines have will definitely require greater current and larger cable. So, if your stock battery cables were 4 AWG, then 2 AWG is a sensible step.
As for aftermarket alternators, we offer the following guidelines, assuming the battery is under the hood:
- Alternators making up to 170A – 4 AWG
- Alternators making up to 225A – 2 AWG
- Alternators making up to 300A – 1/0 AWG
- Alternators making more than 300A – 2/0 AWG
For aftermarket accessories, we always recommend following the guidelines of the manufacturer. There are a few exceptions – winches and inverters for example. Do all winches really get on with 2 AWG cables, no matter their rating? Of course not. I’d hate to rely on the cheesy, stock 2 AWG cables for an 18,000lb winch when you needed everything it had to get you out of wherever you got stuck. Do all inverters really need 4/0 AWG per the instructions? Also, of course not.
Battery Cable Basics
When designing your new set of cables there are a few things to consider.
Replicating Cables
If you’re replicating a set of OEM battery cables so that they fit just like factory, keep in mind that bean counters often had the final say in these designs. Case in point would be any GM vehicle built in the 70s or 80s where the negative battery cable assembly bolts to the cylinder head or even the alternator bracket. The best place for the large cable to go is to the engine block itself. However, even saving an inch or two of cable by going to the head meant millions of dollars in savings realized on mass produced vehicles.
There are numerous threaded bosses in every make of engine block that you can utilize for this. If your build isn’t about the last word in originality, you’re always better off connecting the large cable there.
Unit-Body vs Body on Frame
- Unit-Body – the frame and body are integrated.
- Body on Frame – the frame and body are separate, and typically isolated with rubber bushings.
For either, the engine block is isolated from the vehicle electrically via the engine mounts. So, a correct battery cable design will have two cables – the large gauge cable that goes to the engine block and a smaller gauge cable that goes to the inner fender or core support. The larger cable is the return path for the starter and alternator. The smaller cable is the return path for all of the body grounded accessories of which there are a great many. Some vehicles have a separate body ground between the engine block and the body instead of the battery negative to body ground. This serves the same purpose.
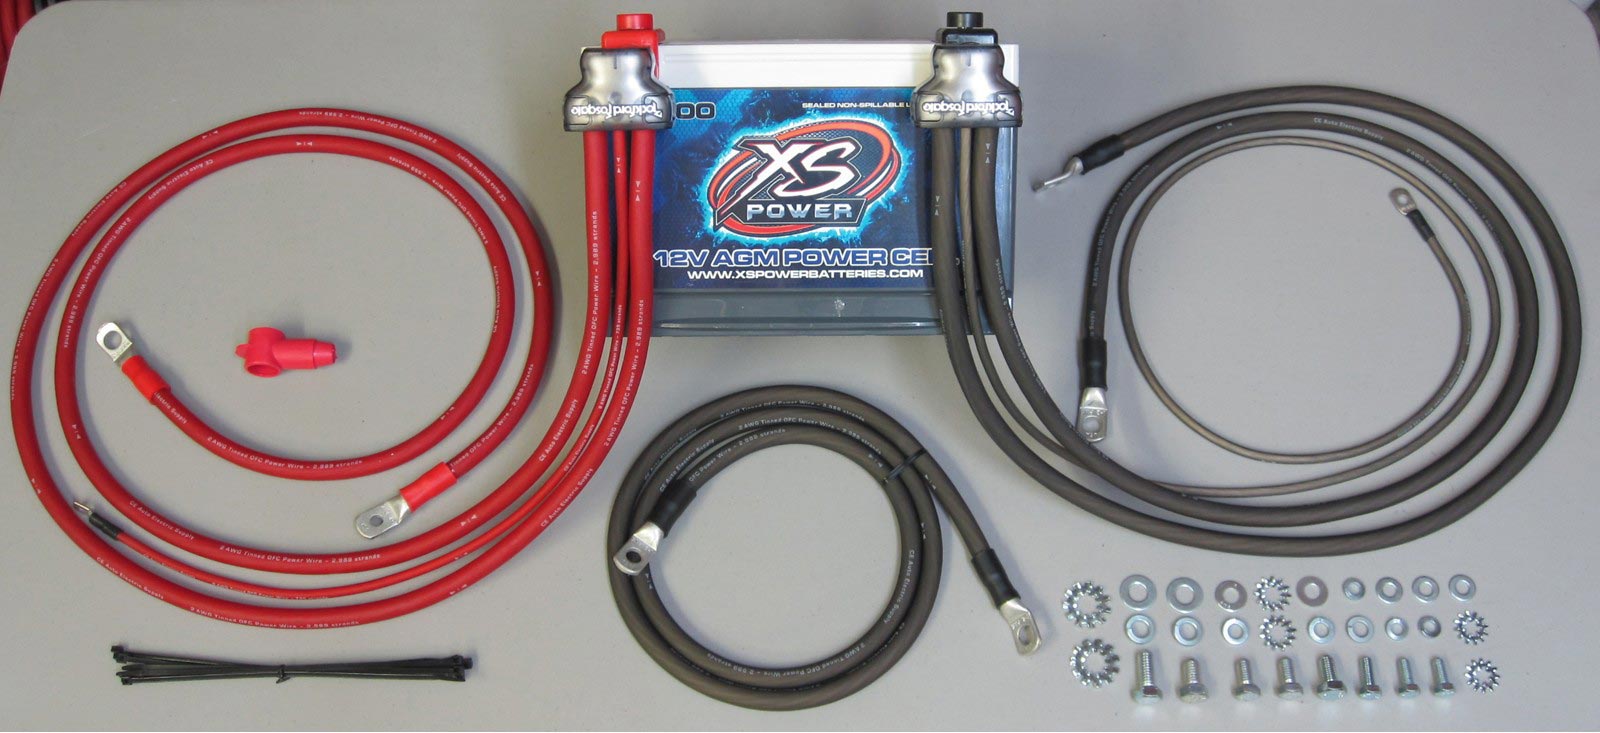
If you overlook the body ground when replacing a factory cable assembly, this will affect the performance of all accessories – slower power windows, dimmer lights, etc. In most cases, you’ll find 10 AWG (or even 12 AWG) accessory ground cables on stock assemblies. Stepping them up to 8 AWG is a low-cost way to improve the performance of such accessories. This is especially critical when relocating the battery to the rear, which is why all our Battery Relocation Kits include this.
Many negative cable assemblies on import vehicles have an eyelet integrated along the run of the cable. This bolts to the body and continues to the engine block, allowing them to use a single cable for both purposes. At this time, this is not a cable that you can build via our builders. But we can build it for you the old-fashioned way – you either send us the original assembly for us to replicate or send us a sketch of it that we can work from.
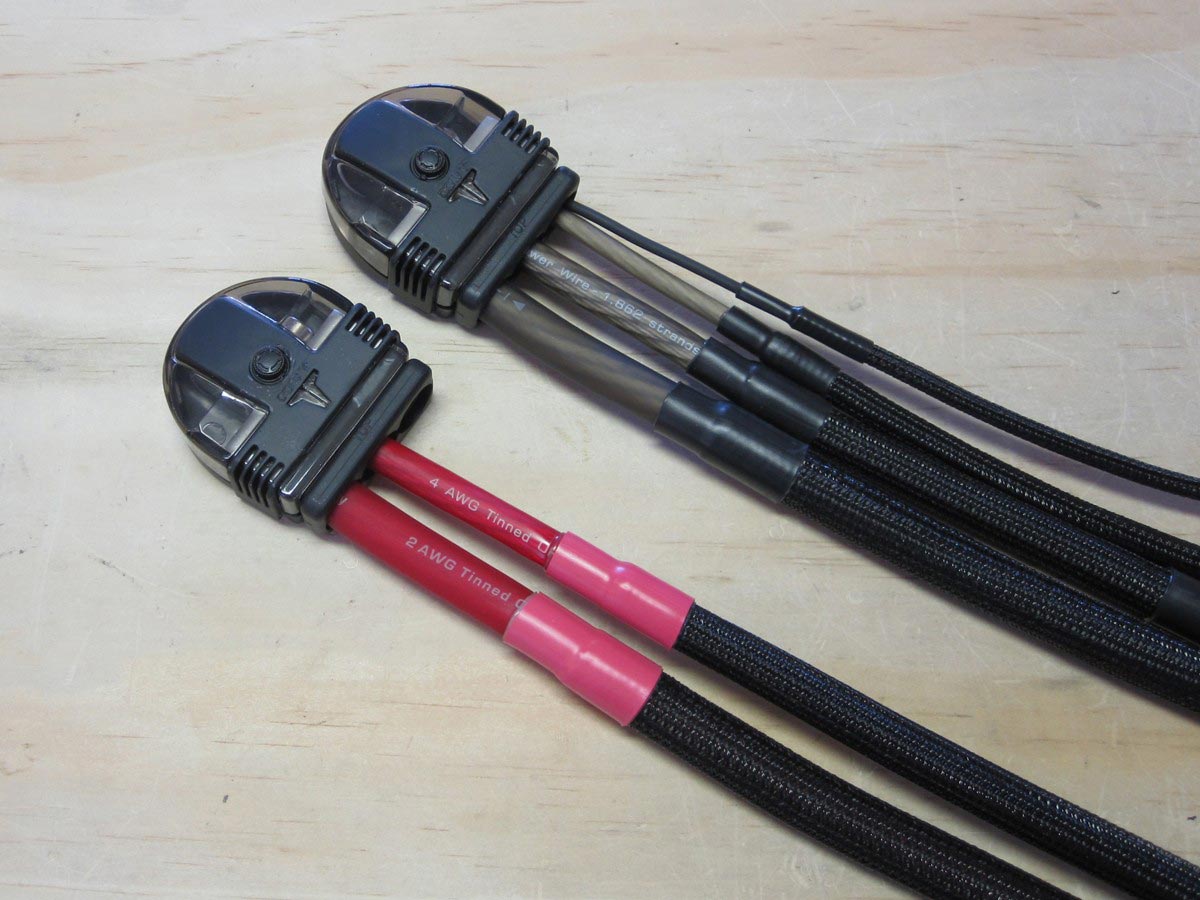
Battery Cables with Multiple Large Gauge Cables
At present, our Custom Cable Builder 2.0 allows you to put many different styles of battery terminals on the cable ends – top post, side post, elbows, etc. In addition, you can add up to two auxiliary cables (in 12, 10, or 8 AWG) to each cable end. But, what if you need an assembly which has two cables, both larger than 8 AWG, coming from a single battery terminal? No problem. We have several ways that you can accomplish this – our Military Battery Terminals, our Aftermarket Battery Terminals, and our Multi-Cable Builder. Here is each explained fully.
Military Battery Terminals
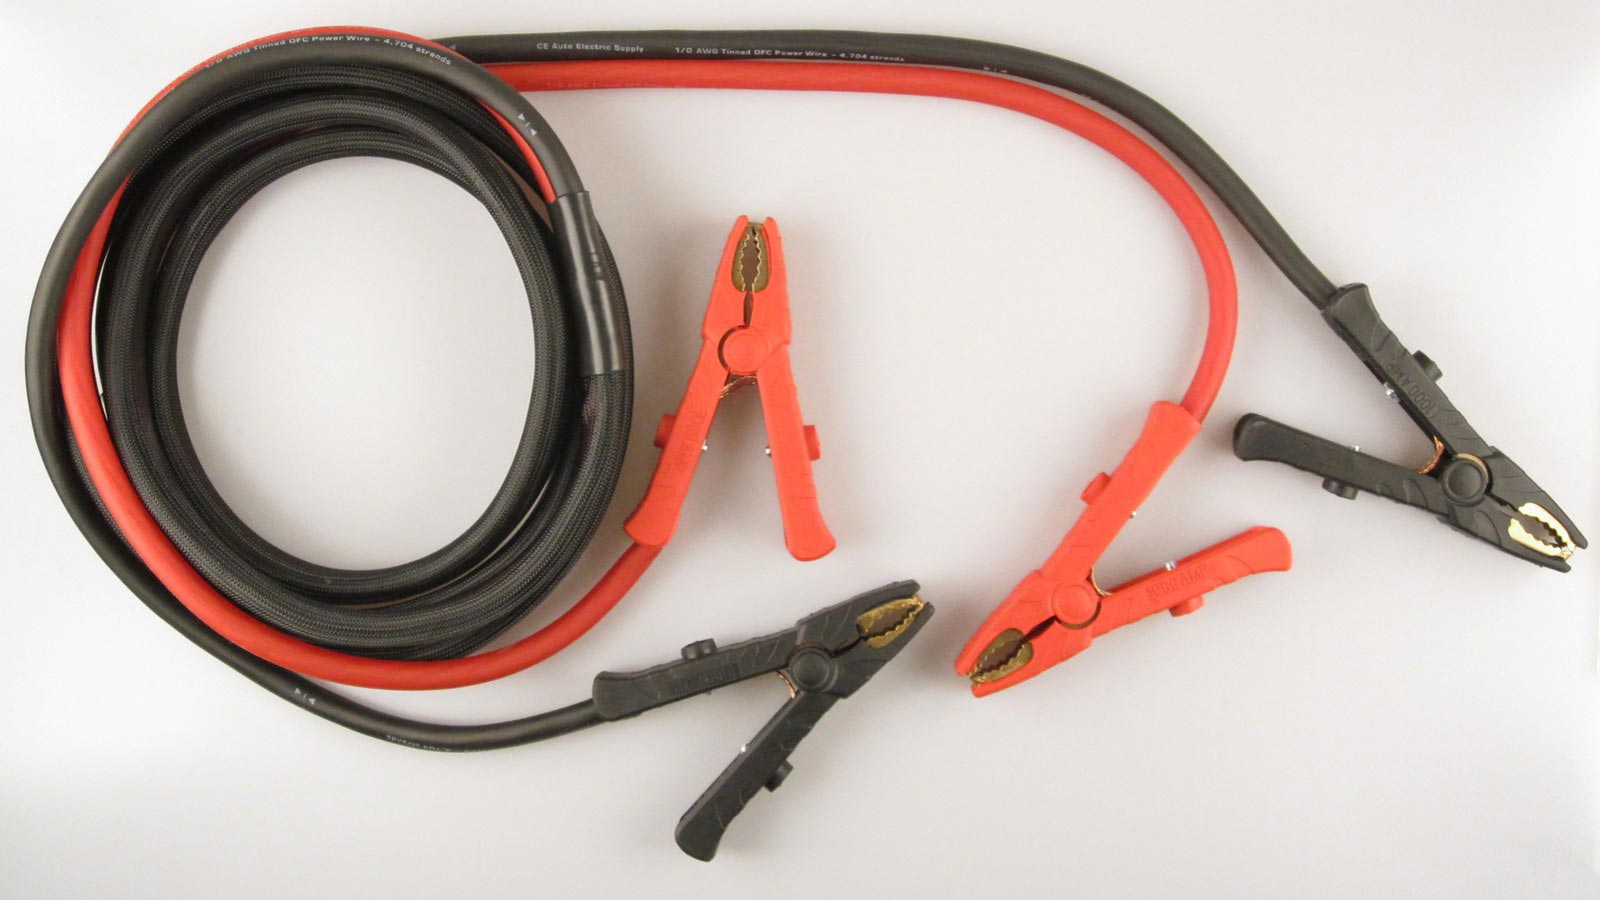
Military Terminals have a large 3/8″ bolt running length wise on the terminal. Cables are terminated with 3/8″ eyelets and simply bolted to the terminals. Up to three cables, up to 3/0 AWG in size, can be bolted to such terminals. You can build such cables in the Custom Cable Builder 2.0 (CCB 2.0) with straight, 45-degree, 90-degree, or even our elbow style MEGA Eyelets for use with these terminals.


Note, if you do intend to use 3/0 AWG cables with these terminals, we offer a 5/16″ bolt pack kit that allows you to shift the cables up on the terminals so that you can get the terminals properly seated on the battery posts. This is almost always necessary with batteries purchased since the middle of 2021 as all the battery manufacturers have reduced the height of the lead posts to save a few pennies.
We also now offer our in-house designed Accessory Stud Adapters separately. These are laser cut from 16 AWG stainless steel, bent, and loaded with stainless hardware. They hug the rear of our Military Battery Terminals to provide greater utility from them.
Here is a link to all these parts – Military Battery Terminals
Aftermarket Battery Terminals
Our selection of Aftermarket Battery Terminals from JL Audio and Rockford Fosgate provide a bunch of connectivity with show car looks. They’re perfect for vehicles with highly detailed engine bays.
We offer two options here:
- Put the battery terminals of your choice in your cart and then use our Custom Cable Builder 2.0 to build cables for them. Be sure to choose “No Right End” as the option when selecting the right cable end.
- Use our Aftermarket Battery Terminal Cable Builder to design and order them to your specifications and we’ll build them for you!
Installing the cables in these terminals is easy. Just cut them to length, carefully remove between 1/2 and 5/8 of an inch of the jacket (depends on the terminal) with a razor blade, insert the cable into the respective opening, and tighten the set screw down. Use a lil’ dab of blue thread locker on the set screws to keep them put. We typically assemble these with the battery terminal secured in a bench vise so that they can be properly tightened with a long-handled ratchet without fear of damaging the battery.

This builder is perfect for those of you that want folks to look twice when they look under the hood. Man, where did you get those battery cables!?!
Multi-Cable Builder
Our Multi-Cable Builder makes it possible to replicate designs which have multiple cables exiting from a single battery terminal or eyelet. This is ideal when you want to achieve a factory type fitment. The Multi-Cable Builder allows you to easily design such cables. In addition, they can be dressed in our Hi-Temperature Wire Covering, Split Braided Tubing, or both! Here are some examples.


As always, our production department can build exactly what you design!
Serviceability
When designing custom cables, you should think about serviceability. What if AAA has to swap the battery on the side of the road for you while you’re on vacation? You certainly don’t want them to have to undo a myriad of crisscrossed cables and wires in doing so. Hey, that goes over there…doesn’t it?
We’ve been at this a LONG time. You’ll never see that in any of our vehicles. When connecting multiple cables to a battery terminal, those cables should all be routed in the same general direction where possible. Tying them neatly together creates a nice assembly. This allows you to loosen the crossbolt, remove the terminal, lift the cable assembly out of the way, and remove the battery.
The second part of this is the lengths of the cables themselves. Designing cables so that they fit perfectly between two points isn’t always best. Rather, design the cables so that they route in such a way that the assembly can be easily lifted off the battery post and manipulated out of the way when you need to swap the battery.
Finally, if you really do need to connect a half dozen cables and wires to the battery terminals, then you really should be considering a nearby located power distribution center. This allows you to move all that congestion to a location designed to neatly facilitate it. We offer these in non-fused as well as fused varieties.
For more on that topic, be sure the check out our blog on How to Design a Power Delivery System.
Care and Longevity
All our cables are built to last the life of the application. However, even the best cable is no match for a lack of maintenance in a caustic environment. Occasional maintenance will keep your cables in tip top shape for as long as you intend to use them.
See the General Maintenance & Health heading of our Charging Systems 101 article for more info.
In Summary
We’ve gone out of our way to make this process easy. I hope you find these tools as helpful as we do!